
Installing and Configuring multi-node Hadoop setup on Linux machine
Hadoop Multi-node setup on Linux
In this post, I will describe the required steps for setting up a distributed, multi-node Apache Hadoop cluster on Linux platform.
What is Hadoop ?
Setting up an Hadoop Multi-node instance can be challenging. I will break this tutorial into a few parts just to make it more organized and so you can track your progress. Remember you will have to follow each of these steps on all of your machines i.e, for master and slaves.
Various steps :
- Setting up Java Runtime Environment
- Configuring the /etc/hosts file
- SSH Setup
- Downloading and configuring Hadoop
- Configuring Master Slave Settings
- Starting Master Slave Setup
- Running first MapReduce Job on Multi-Node Cluster
Setting up hadoop with a new user account is recommended but you can also continue as root user, if you want.
Step 1 : Setting up Java Runtime Environment
A Java environment is compulsory for hadoop cluster since almost all the plug-ins in hadoop are written in Java.
If you use proxy on your network, then first setup proxy in the terminal:
export http_proxy=http://ip_address:port
eg, export http_proxy=http://192.168.0.2:8080
Now, update the repository :
sudo apt-get update
sudo apt-get install sun-java6-jdk
( or you can also download the tarball from java's official website www.java.com and install it.)
Now, setup environmental variables :
export JAVA_HOME=/usr/lib/jvm/java-6-sun
export PATH=$PATH:$JAVA_HOME/bin
Step 2 : Configure the /etc/hosts file
This file keeps the record of hostnames on your system. In simple words, it links IP address of a system to a particular name i.e, hostname.
Type man hosts in terminal for more details.
Open hosts file in your favourite editor and setup DNS for master and slave :
sudo nano /etc/hosts
In this file add following lines:
192.168.0.2 master
192.168.0.2 slave1
192.168.0.3 slave2
Save and exit the file.
Step 3 : SSH Setup
Hadoop uses SSH protocol for logging into remote machines i.e, slaves.
Install ssh first using apt-get :
sudo apt-get install ssh
To start SSH service on your system type following command :
service ssh start
After installing ssh, we need to configure passwordless ssh connection between master and both slaves. For that first create a ssh key on master system by using following command :
cd ~/.ssh
ssh-keygen
Enter a name for the file and keep pressing Enter key, to keep it passwordless. Taking the file name here as xyz. Above process will create a .pub file, which you need to copy into all the slaves.
Now, use following command to copy it into each slaves :
ssh-copy-id -i $HOME/.ssh/xyz.pub user@slave1
ssh-copy-id -i $HOME/.ssh/xyz.pub user@slave2
(Each time it will ask for user password, just enter the password and continue to next step.)
Now, test the ssh login for both slaves, using following commands :
ssh slave1
ssh slave2
These logins must be passwordless.
Repeat above steps for the master because master can also act as slave at the same time.
i.e, ssh master
(This login also must be passwordless)
Step 4 : Download and configure Hadoop
Download the latest hadoop package from here and extract it in any directory using the following command.
(In my case i am extracting in /opt directory.)
sudo tar -xvf hadoop*.tar.gz -C /opt
sudo mv /opt/hadoop* /opt/hadoop (renaming the folder to hadoop)
sudo chown user:hd /opt/hadoop/*
(In my case i am extracting in /opt directory.)
sudo tar -xvf hadoop*.tar.gz -C /opt
sudo mv /opt/hadoop* /opt/hadoop (renaming the folder to hadoop)
sudo chown user:hd /opt/hadoop/*
(use this command to change the ownership of HADOOP_HOME, Ignore if you are root user)
So, HADOOP_HOME=/opt/hadoop/
Now, create a folder which Hadoop will use to store its data file
sudo mkdir -p /app/hadoop/tmp
sudo chmod 777 /app/hadoop/tmp
sudo chown user:hd /app/hadoop/tmp
(use this command to change the ownership, Ignore if you are root user)
Now edit four more files in the same directory :
cd /opt/hadoop/conf (changing the directory)
1. core-site.xml
<configuration>
<property>
<name>hadoop.tmp.dir</name>
<value>/app/hadoop/tmp</value>
<description>Temporary directories.</description>
</property>
<property>
<name>fs.default.name</name>
<value>hdfs://master:54310</value>
<description>Default file system.</description>
</property>
</configuration>
2. hdfs-site.xml
<configuration>
<property>
<name>dfs.replication</name>
<value>3</value>
<description>Default block replication.</description>
</property>
</configuration>
Value of dfs.replication = No. of master + No. of slaves
In our case it is 3.
3. mapred-site.xml
<configuration>
<property>
<name>mapred.job.tracker</name>
<value>master:54311</value>
<description>MapReduce job tracker.</description>
</property>
</configuration>
There are some other optional properties which can be included (not necessary) :
“mapred.local.dir“, “mapred.map.tasks“ , “mapred.reduce.tasks“
-
4. hadoop-env.sh
In this file add following three lines :
export HADOOP_HOME_WARN_SUPPRESS="TRUE"
export JAVA_HOME=/usr/lib/jvm/java-6-openjdk-i386/
export HADOOP_OPTS=-Djava.net.preferIPv4Stack=true
First is to, remove $HADOOP_HOME is deprecated warning.
Second sets the JAVA_HOME environmental variable which hadoop will use while running.
and Third line is to prefer IPv4, because by default hadoop uses IPv6.
Step 5 : Configuring Master Slave Settings
Now, we are going to edit two important files viz. 'masters' & 'slaves'.
'masters' file contains the list of master.
'slaves' file contains the list of all slaves.
cd /opt/hadoop/conf
On master machine :
sudo nano slaves
master
slave1
slave2
sudo nano masters
master
On slaves :
sudo nano slaves
localhost
sudo nano masters
localhost
On master machine :
sudo nano slaves
master
slave1
slave2
sudo nano masters
master
On slaves :
sudo nano slaves
localhost
sudo nano masters
localhost
Step 6 : Starting Master Slave Setup
(Note all of the steps below will be done on the Master machine only)
First thing we need to do is format the hadoop namenode, run following command:
export PATH=$PATH:/opt/hadoop/bin
hadoop namenode -format
Now, to start the cluster, enter following command :
start-all.sh
Now, to see the list of running processes on JVM, use this command :
jps
You should see :
On master :
23432 NameNode
45654 DataNode
68965 SecondaryNameNode
32433 Jps
34567 JobTracker
36733 TaskTracker
On slaves :
45645 DataNode
46454 Jps
56756 TaskTracker
Step 7 : Running your first MapReduce Job
First create a folder named 'input' copy the content of conf folder into it.
hadoop fs -put conf input
Now in HADOOP_HOME directory, you will see a jar file hadoop-examples-*.jar. This is java based MapReduce program. To run this enter following command :
hadoop jar hadoop-examples-*.jar grep input output 'dfs[a-z.]+'
Note :
On master machine, you can use following URLs for Hadoop management, HDFS browsing and to see the status of whole cluster :
http://localhost:50030
http://localhost:50060
http://localhost:50070
Now, to stop the multi-node hadoop cluster, use following command :
stop-all.sh
If you are done with hadoop multi-node setup then, there are only few small changes to get a single-node cluster.
Two changes :
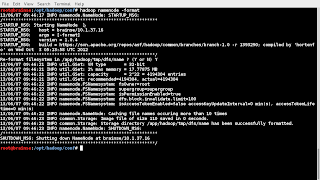
(Image while formatting namenode, step 6)
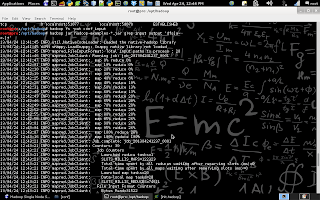
(While running MapReduce task, Step 7)
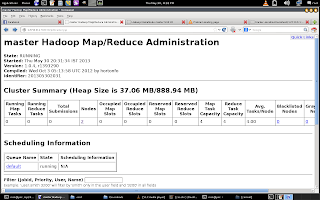
(Hadoop Map/Reduce Administration)
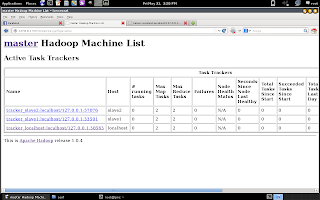
(Multi-node cluster : machines list)
For any query, comment below.
hadoop fs -put conf input
Now in HADOOP_HOME directory, you will see a jar file hadoop-examples-*.jar. This is java based MapReduce program. To run this enter following command :
hadoop jar hadoop-examples-*.jar grep input output 'dfs[a-z.]+'
Note :
On master machine, you can use following URLs for Hadoop management, HDFS browsing and to see the status of whole cluster :
http://localhost:50030
http://localhost:50060
http://localhost:50070
Now, to stop the multi-node hadoop cluster, use following command :
stop-all.sh
Note :
Hadoop Single-node setup on Linux
If you are done with hadoop multi-node setup then, there are only few small changes to get a single-node cluster.Two changes :
- Edit 'slaves' file
- Change value of replication in hdfs-site.xml
Step 1 :
Open slaves file and remove the hostnames of all slaves. There should be only one name i.e, master.
Step 2 :
Open hdfs-site.xml file and change the value of replication to 1
And you are done. Your single-node cluster is ready.
Below are some screenshots taken during hadoop multi-node cluster setup.
Open slaves file and remove the hostnames of all slaves. There should be only one name i.e, master.
Step 2 :
Open hdfs-site.xml file and change the value of replication to 1
And you are done. Your single-node cluster is ready.
Below are some screenshots taken during hadoop multi-node cluster setup.

(Image while formatting namenode, step 6)

(While running MapReduce task, Step 7)

(Hadoop Map/Reduce Administration)

(Multi-node cluster : machines list)
For any query, comment below.
0 comments :